

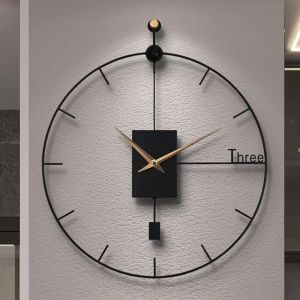
xpkQ Modern Design Wall Clock Swingable Wall Clocks Living Room Modern Vintage Pendulum Clock Large Brief Wall Home Decor K6R8Z
.product-description {position: ;max-width: 944.0px;overflow: hidden;} .product-description span {max-width: 100.0%;word-break: break-word;} .product-description img {max-width: 100.0%;vertical-align: middle;} .product-description p {margin: 0;line-height: inherit;} .product-description pre {white-space: pre;white-space: pre-wrap;word-wrap: break-word;} .product-description .video-container-detail {justify-content: center;align-items: center;} .product-description div {} .product-description ul {list-style-type: disc;} .product-description ol {list-style-type: decimal;} .product-description ul, .product-description ol {margin-block-start: 1.0em;margin-block-end: 1.0em;margin-inline-start: 0.0px;margin-inline-end: 0.0px;padding-inline-start: 40.0px;} Material: MetalStyle: Modern minimalistMovement type: Scanning movementProcess: PaintingMirror material: metalPower Type: BatteryDial Material: MetalSize: 50X57.8CMQuiet movement, accurate travel time, durable, metal aluminum pointer, simple metal bracket, metal round rod frame, metal creative swing head design.Wall clock wall installation instructions:Considering the different wall structures and wall clock structures, you can choose more suitable installation accessories for installation.1. For hard cement walls or wall clocks with a large weight, you can choose drilling hooks (bare cement nails can be directly knocked into the wall) to drill holes in a fixed position, knock in the rubber plug and screw in the screws.2. Latex paint or wood wall can be installed with non-marking nails. 1. Put the nut into the groove on the back 2. Use a hammer to nail the non-marking nail horizontally into the wall 3. Penetrate the screw into the brick hole and screw it in 4. This way the installation is complete.Pointer installation:1. Place the clock flat on the desktop 2. Install the hour hand first, align it with the 12 o'clock position, and press it with a little force on both sides of the pinhole with both hands. Pay attention to uniform force to avoid damaging the pointer. 3. Install the minute hand, align it with the 12 o'clock position and press it with a little force on both sides of the pinhole with both hands. Pay attention to uniform force to avoid damaging the pointer. 4. Align the with the hole and press it. 5. After the installation is completed, pay attention to check whether the three hands are parallel. Be sure to install and adjust them parallel so that they will not get stuck together after rotation. 6. Finally adjust the red gear on the back movement to adjust the time, do not dial the point.

xpkQ
Review

You May Also Like

SG [Stock] Himalayan Pink Salt 100% Natural Rock Salt Feng Shui Mineral Salt Crystal Home Decor Energy Stone

VIKAMA Cute Cartoon Reindeer Doormat Soft Non Slip Entryway Mat Christmas Holiday Decorative Rug Washable for Porch Foyer Decor

Hysses Home Scent Reed Diffuser Rose Hiba 150ml

VIKAMA Vintage Oil Painting Ghost Lake Autumn Wall Tapestry Halloween Spooky Spirit Moon Bird Fall Forest Water Scenery Bedroom
CIFbuy | Wheel of the Year Calendar - Unique Wicca Wall Art Featuring Moon Phases & Seasonal Celebrations

INVADER Silicone Door Stopper Wall Protectors Anti Collision Doorstop Hidden Floor Holder Bedroom

已开光 桃木葫芦五帝钱挂件门对门家用卧室门人财两旺真品纯铜加厚保平安中国结 Opened Peach Wood Gourd Five Emperors Money Pendant Door-to-door Household Bedroom Door Rencai Liangwang Genuine Pure Copper Thickened To Ensure Safety Chinese Knot
LSHE | Retro Light for Ambience

🎉𝐒𝐆 𝐋𝐨𝐜𝐚𝐥🎉4.5m福袋窗帘灯10挂 Icicle Curtain String Light 10hanging Light Chinese New Year Lights Lantern CNY Decorations 2026

Privacy Heat Resistant Sun Protection White Sheer Curtain

🇸🇬 [SG Seller & Local Stock ] Moonlight Candle warmer with 3 timer option [MCW003]